
Upgrading your home heating system with a high-quality brass radiator valve is one of the most effective ways to improve heat regulation and energy efficiency. Unlike cheaper plastic alternatives, brass valves offer superior durability, better heat conduction, and resistance to corrosion. This comprehensive, step-by-step guide will walk you through the entire installation process from preparation to final testing. With just basic tools and about 60-90 minutes of your time, you can achieve professional-level results that will enhance your home’s comfort while potentially reducing your energy bills. Let’s get started with everything you need to know for a successful installation.
1. Essential Tools and Materials for the Job
Before beginning any work, it’s crucial to gather all necessary equipment. You’ll need an adjustable wrench (preferably two for easier work), high-quality PTFE pipe tape (also called thread seal tape), a medium-sized bucket for water drainage, and clean rags or towels. When selecting your new brass valve, consider investing in a thermostatic radiator valve (TRV) for automatic temperature regulation – these typically cost between 20−20−50 but offer significant energy savings. Verify that the valve size (usually 1/2″ or 3/4″) matches your existing radiator connections. For older radiators, you might also need pipe joint compound or penetrating oil for stubborn connections. Always turn off your central heating system at least an hour before starting to allow the radiators to cool completely.
2. Preparing and Draining Your Radiator
Begin by locating the drain valve (also called a drain cock) at the bottom of your radiator – it typically looks like a small square or hexagonal nut. Place your bucket directly beneath this valve to catch water, and consider putting down old towels for additional protection against spills. Using an adjustable wrench, slowly turn the drain valve counterclockwise about a quarter turn to start the water flow. Be patient as this process can take 5-10 minutes depending on your radiator size. For complete drainage, carefully tilt the radiator away from the wall using wooden shims or blocks – this helps remove any remaining water trapped in the system. Some systems may require you to also open the bleed valve at the top during draining to break the vacuum effect. Remember that radiator water may be discolored or contain rust particles, so wear gloves and protect your flooring.
3. Removing the Old Valve Safely
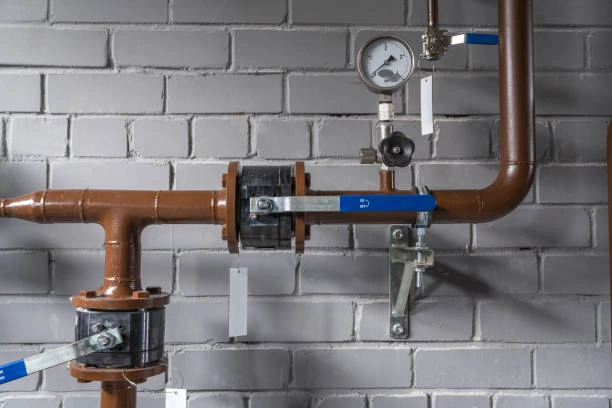
With the radiator fully drained, examine how the existing valve connects to both the radiator and the supply pipe. Use one wrench to hold the radiator tail (the pipe coming from the radiator) steady while using another wrench to loosen the compression nut connecting the valve. If the connection resists, apply a small amount of penetrating oil (like WD-40) and wait 10-15 minutes before trying again. For particularly stubborn valves, gently heating the connection with a hairdryer can help break the seal. Once loose, carefully unscrew the valve completely, being mindful not to put stress on the pipes. Take this opportunity to clean the exposed pipe threads thoroughly with a wire brush or steel wool to remove any old tape, debris, or corrosion. This cleaning step is crucial for ensuring a watertight seal with your new valve. Inspect the radiator tail for any damage that might need addressing before proceeding.
4. Proper Preparation of the New Brass Valve
Unpack your new brass radiator valve and familiarize yourself with its components. Most quality valves will include a valve body, adjustable head, and sometimes additional washers or O-rings. Begin by wrapping the radiator tail threads with PTFE tape – start about two threads back from the end and wrap clockwise (as viewed from the end) for 5-6 complete turns. The tape should lay smooth and flat without wrinkles. For added security, some plumbers recommend applying a thin layer of pipe joint compound over the tape. Before installing, set the valve to its fully open position (usually indicated by a fully counterclockwise turn or the “max” setting on TRVs). Hand-tighten the valve onto the radiator first to ensure proper threading alignment – you should feel smooth, even resistance without any catching or binding. This preliminary hand-tightening prevents cross-threading that could damage both the valve and radiator connections.
5. Secure Installation and Connection
With the valve hand-tightened, use your adjustable wrench to give it an additional quarter to half turn – brass fittings require careful tightening as over-torquing can crack the metal or distort the seals. The general rule is to tighten until snug, then add about 1/8th turn more. Ensure the valve is oriented correctly for easy operation – thermostatic heads should face outward for air flow sensing. If your system includes a lockshield valve on the opposite side, consider balancing your radiators after installation. Reattach any mounting brackets or supports, making sure not to put strain on the pipes. For the cleanest installation, align any valve markings or indicators to be easily readable from the normal viewing position. Double-check that all connections are secure but not overtightened, as this is the most common cause of leaks in DIY installations. Take a moment to clean any fingerprints or debris from the new valve before proceeding.
6. System Refill and Thorough Testing
Begin the refill process by first ensuring all drain and bleed valves are closed. Slowly open the system’s water supply valve to allow gradual refilling – this prevents airlocks and reduces stress on the system. As the system pressurizes, go to each radiator in the house and bleed them starting with the lowest floor. You’ll hear a hissing sound as air escapes; close each bleed valve when a steady stream of water appears. Once the system is full, turn your heating back on and let it reach normal operating temperature. Carefully inspect your new valve connection for any signs of leakage – a small drip might just need slight tightening, while persistent leaks may require redoing the tape and sealant. Test the valve’s operation by adjusting it through its full range of motion while feeling for heat changes in the radiator. This is also a good time to check other radiators in your home for balanced heat distribution.
7. Optimizing Temperature Control Settings
If you’ve installed a thermostatic brass radiator valve (TRV), take time to understand its settings. Most use a numbered dial (typically 1-5 or 1-6) representing temperature ranges rather than exact degrees. As a general guide: Setting 3 (about 20°C/68°F) works well for living areas, while bedrooms might use 2 (18°C/64°F). The snowflake symbol (❄) is a frost protection setting (about 7°C/45°F) for unused rooms. Avoid placing furniture or heavy curtains in front of TRVs as this affects their temperature sensing. For optimal efficiency, program your heating to maintain lower background temperatures with TRVs boosting heat in occupied rooms. Keep in mind that TRVs work best when you maintain consistent base temperatures rather than turning heating completely off and on. Monitor your energy usage over the first few weeks to identify potential savings from your new installation.
8. Long-Term Maintenance and Care
Regular maintenance will extend your valve’s lifespan beyond a decade. Every 3-6 months, wipe the valve body with a damp cloth to remove dust (avoid harsh chemicals that could damage finishes). Before each heating season, check for leaks and ensure smooth operation – stiff valves can often be remedied with a small amount of silicone lubricant on the moving parts. If you notice reduced heating performance, the valve pin might be stuck – gently tap it with a small hammer or pry it up with pliers. Consider replacing rubber washers or O-rings every 3-5 years as preventive maintenance. In hard water areas, watch for mineral buildup that could impair function. For thermostatic valves, periodically verify temperature accuracy by comparing with a room thermometer. Always keep the valve’s instruction manual for reference regarding specific maintenance requirements or replacement parts. Proper care ensures your investment continues providing comfort and savings for years to come.
International Standards
IFAN Brass ball valves are widely used in various fluid control applications due to their durability, reliability, and high resistance to corrosion. To ensure these valves meet the necessary safety and performance requirements, they are designed according to numerous international standards. For instance, ASTM 2846 outlines specifications for thermoplastic ball valves, while DIN 8079/8080 focuses on compatibility with polyethylene and polypropylene pipes. Additionally, standards such as ASTM F441/F441M SCH80 and AS/NZS 1477 ensure the valves’ effectiveness in PVC piping systems. By adhering to these strict regulations, brass ball valves maintain optimal performance, ensuring they are suitable for both residential and industrial settings, including drinking water systems, with certifications like NSF/ANSI 14.
Connect
IFAN is a Chinese manufacturer of plastic pipes, fittings and valves with 30 years of experience. If you are interest in IFAN copper fittings, copper valves, plastic pipes and fittings, please contact us. IFAN offers you a variety of standard pipes to meet your specific needs. Click below to learn more about IFAN’s wide range of affordable and cost-effective valve products and piping system related products.
We will reply your email or fax within 24 hours.
You can call us at any time if there is any question on our production.
For more information,pls visit our webside https://www.waterpipefactory.com/
Pls Mailto: [email protected]
Whatsapp: + 86 152 1588 7738